Testseite1
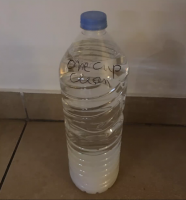
One Cup One Life (Ein Becher ein Leben) - Produktion und Anwendung - Vorbeugung und Umkehrung des Coronavirus - Nicht durch Töten, sondern durch Entzug seiner Energie, sowie die höhere Feldstärke der niedrigeren Feldstärke gibt - Das ist das Universelle Gesetz: Je mehr man gibt, desto mehr erhält man.
Inhaltsverzeichnis
- 1 Produktion des OneCup OneLife
- 1.1 Benötigte Ausstattung
- 1.2 Produktion der blanken Kupferspule
- 1.3 Herstellen der Nano-beschichteten Spule
- 1.4 Vorbereiten der Zinkplatte
- 1.5 Vorbereiten der Verbindungsdrähte
- 1.6 Verbinden der blanken Kupferspule und Zinkplatte
- 1.7 Verbinden der Zinkplatte
- 1.8 Formen der Kupferbrücke und Verbinden der nanobeschichteten Kupferspule
- 1.9 Platzieren der Spulen und Zinkplatte am Glas
- 1.10 Verbinden der Batterie mit den Verbindungsdrähten
- 1.11 Herstellen der 15%igen Salzwasserlösung: 150 Gramm pro 1 Liter sauberes Wasser
- 2 Produktion der Materialien (Aminosäuren und GANS)
- 3 Preparing the materials for the first harvest of Amino Acids, GANS and Plasma Water
- 3.1 Materials needed to extract the GANS from the One Cup One Life
- 3.2 First application, how to remove first the Amino Acids from the One Cup One Life before removing the GANS
- 3.3 Removing the GANS from the One Cup One Life
- 3.4 Washing of your GANS
- 3.5 Making the Plasma Water ready to be applied
- 3.6 Working with several cups of One Cup One Life and Twin Cups
- 3.7 HOW TO APPLY IN A SAFE MANNER YOUR PLASMA WATER AND GANSES FROM YOUR ONE CUP ONE LIFE OR YOUR TWIN CUPS
- 3.8 Different ways of storing of the Plasma Waters, GANSes, Amino Acids
- 4 Different applications of Plasma Water
- 5 Different additional information
- 5.1 Additional explanation on the fire Nano-coating of the One Cup One Life
- 5.2 Application with battery or without
- 5.3 Understanding the Soul of the One Cup One Life
- 5.4 Useful tips
- 5.5 How to produce Amino Acids when your cup is not producing sufficient enough
- 5.6 New: Twin Cup of One Cup One Life
- 5.7 Mr. Keshe explained why the application of the One Cup One Life with this Coronavirus epidemic
- 6 Important
Produktion des OneCup OneLife
Benötigte Ausstattung
Auf diesem Bild sehen Sie die gesamte Ausrüstung und die bereits vorbereiteten Materialien, die Sie für die Herstellung des One Cup One Life und des GANS Plasma Wassers benötigen. Nachfolgend finden Sie alle Materialien und die notwendigen Schritte detailliert beschrieben

Gasbrenner, Feuer und Zange(n)
3 Verbindungskabel
Zinkplatte, Nano-beschichtetet Kupferspule, blanke Kupferspule
Klebeband und Batterie
Leeres Glas, sauberes Wasser/Leitungswasser, Kochsalz/Tafelsalz*, Waage
*Wenn auf dem Etikett Ihres Salzes Jod angegeben ist, ersetzen Sie es durch das weiße Meersalz, das kein Jod enthält. (E 535 (Natriumferrocyanid) und E 536 (Kaliumferrocyanid) sind in Ordnung oder sogar vorteilhaft).
Im Notfall können Sie jodhaltiges Salz verwenden.
Produktion der blanken Kupferspule
Für den One Cup One Life werden zwei Spulen aus Kupferlitzendraht hergestellt. Für die eine wird blanker Kupferdraht und für die andere Nano-beschichteter Kupferdraht verwendet. Man benötigt pro Spule ungefähr 30 cm Draht.
Vorbereitung des Kupferlitzendrahtes
Litzendraht zeichnet sich dadurch aus, dass viele kleine Litzen zusammen einen Draht ergeben (Siehe Foto). Sie finden es im Baumarkt, im Elektrogeschäft oder im Notfall zu Hause im Stromkabel des Föns, des Radios, des Fernsehers, der Kaffeemaschine usw. Ziehen Sie dazu einfach den Stecker des Stromkabels aus der Steckdose. Schneiden Sie das gesamte Stromkabel des Geräts ab, um die gesamte Länge ausnutzen zu können..

Entfernen des Kunststoffs vom Draht
Normalerweise sind in einem Stromkabel zwei oder drei Drähte vorhanden. Der Kunststoff-Außenmantel muss zuerst entfernt werden. Dazu gibt es mehrere Möglichkeiten. (Wenn Sie die Litzen separat kaufen, ist dieser Schritt nicht notwendig)
Variante 1
Eine Möglichkeit, die äußere Hülle zu entfernen, besteht darin, das Messer in einer Hand zu halten, das Kabel darauf zu legen und es mit dem Daumen vorsichtig zu drücken. Mit der anderen Hand, wie auch mit dem Daumen, dreht/wälzt man das Kabel und das Messer schneidet immer tiefer in den Kunststoff ein. Wenn Sie die inneren Drähte erreicht haben, können Sie den abgetrennten Kunststoffteil von den inneren Drähten abziehen. So gehen Sie Schritt für Schritt vor, bis die inneren Kabel freigelegt sind.


Variante 2
Eine andere Möglichkeit ist, das Kabel auf den Tisch zu legen und mit einer Hand zu halten. Drücken Sie die Klinge in einem leichten Winkel auf den Kunststoff und ziehen Sie mit der anderen Hand das Kabel einfach entgegen der Schnittrichtung nach hinten. Auf diese Weise nehmen Sie einen Teil des Kunststoffs ab und können die Drähte herausnehmen.
Jeder hat unterschiedliche Ansätze. Mit ein wenig Probieren werden Sie herausfinden, welcher Weg für Sie am besten funktioniert.


Abstreifen des Kunststoffs von den Litzen
Nun haben Sie 2 oder 3 Drähte freigelegt, die ebenfalls mit Kunststoff ummantelt sind. Für diese Drähte ist es am besten, Variante 2 zu verwenden, um den Kunststoff zu entfernen. Machen Sie dasselbe wie oben. Insbesondere mit der Litze, es könnte etwas Übung erfordern. Legen Sie das Messer mit der Schneide leicht schräg, mit etwas Druck auf den Kunststoff und ziehen Sie den Draht mit der anderen Hand, gegen die Schneiderichtung, darunter durch. Wenn Sie das Messer zu steil halten oder zu stark drücken, könnten Sie in die dünnen Litzen schneiden, wenn Sie es zu locker halten, könnten Sie über den Kunststoff nach oben rutschen und an der gleichen Stelle wieder beginnen. Keine Sorge, ein paar durchgeschnittene Stränge sind kein Problem. Mit etwas Übung verbessern Sie sich schnell. Entfernen Sie den Kunststoff vollständig.


Zusammendrehen der einzelnen Litzen des Drahtes
Halten Sie ein Ende der Drahtlitzen in einer Hand und das andere Ende in der anderen Hand. Drehen Sie die Litzen mit den Fingern zusammen, wobei Sie an einem Ende beginnen und sich bis zum anderen durch arbeiten. Vergewissern Sie sich, dass Sie die Litzen fest zusammendrehen und dass Sie alle feinen Litzen, die eventuell abgeschnitten wurden, mit dem restlichen Draht verdreht werden.


Wickeln der Spule
Um die Spule zu wickeln, nehmen Sie einen Bleistift oder etwas anderes Rundes und halten Sie sie mit dem Ende des Drahtes in einer Hand zusammen. Mit der anderen Hand wickeln Sie den Draht vollständig um das Kabel. Ziehen Sie nun beide Enden des Drahtes wieder fest zusammen, so dass er eng anliegt, und schieben Sie die Wicklungen zusammen. Die Spule ist fertig und kann vom Bleistift abgenommen werden.


Herstellen der Nano-beschichteten Spule
Nano-beschichten des Drahtes für die zweite Spule
Before the wire is wound to the second coil, it must be Nano-coated. This requires a gas burner. You turn on the gas and ignite carefully. Hold one end of the wire with pliers. With your other hand you carefully hold the other end of the wire with your fingers. Starting with the side held by the pliers, you hold the wire in the fire until it glows. As the wire heats up it will begin to turn red so be careful the end of the wire can become hot. Move steadily down the wire to the other end. The whole wire becomes red-hot and turns black. Before it gets too hot at the other end of the hand, you stop and put the wire on something solid and let it cool down. The whole wire has to get black. To do this, you can repeat the process from one side to the other. Remember the wire must glow red even at the ends. Allow the wire to cool down then proceed to the next step.
Please never cut a Nano-coated wire!
Bevor der Draht zur zweite Spule gewickelt wird, muss er Nano-beschichtet werden. Dazu ist ein Gasbrenner erforderlich. Man schaltet das Gas ein und entzündet die Flamme vorsichtig. Halten Sie ein Ende des Drahtes mit einer Zange fest. Mit der anderen Hand halten Sie das andere Ende des Drahtes vorsichtig mit einer zweiten Zange, oder mit den Fingern fest. Beginnend mit der Seite, die von der Zange gehalten wird, hält man den Draht in das Feuer, bis er glüht. Bewegen Sie den Draht glühend, gleichmäßig zum anderen Ende. Der mit der Flamme glühend abgefahrene Bereich wird danach sofort schwarz. Bevor es am anderen Ende der Hand zu heiß wird, falls sie ein Ende mit der Hand halten, halten Sie an und legen den Draht auf etwas Festes und lassen ihn abkühlen. Der ganze Draht muss schwarz werden. Dazu kann man den Vorgang von einer Seite zur anderen, oder generell mehrmals, wiederholen. Denken Sie daran, dass der Draht auch an den Enden rot glühen und schwarz werden muss. Lassen Sie den Draht abkühlen und fahren Sie dann mit dem nächsten Schritt fort.
Bitte schneiden Sie niemals einen Nano-beschichteten Draht durch!


Wickeln der Nano-beschichteten Spule
Der Nano-beschichtete Kupferdraht wird gleich wie zuvor der blanke Kupferdraht um einen Bleistift, oder etwas ähnliches Rundes, zur Spule gewickelt..jpg)

Vorbereiten der Zinkplatte
Use only pure Zinc for the Zinc plate, or wire. Don’t use galvanized Iron, or chicken wire. You can get it in the hardware store, at the plumber, or in an emergency from the roof of a house, or from a battery. The cover of batteries is often made of Zinc, but this depends on which continent or country you live in. You can test the cover with a magnet. If the magnet sticks, it is not Zinc.
When the Zinc plate is ready, it is bent at the top to hang it on the edge of the glass later.
Verwenden Sie nur reines Zink für das Zinkblech oder den Zinkdraht. Verwenden Sie kein verzinktes Eisen oder Maschendraht. Sie können es im Baumarkt, beim Klempner bekommen, oder in einem Notfall vom Dach eines Hauses oder von einer Batterie entnehmen. Die Außenhülle von Batterien (Zink-kohle Batterien) besteht oft aus Zink, aber das hängt davon ab, auf welchem Kontinent oder in welchem Land Sie leben. Im deutschsprachigen Raum erhält man meistens Batterien mit Zinkhülle. Sie können die Hülle mit einem Magneten testen. Wenn der Magnet haftet, ist es kein Zink.
Wenn die Zinkplatte fertig ist, wird sie oben gebogen, um sie später an den Rand des Glases zu hängen.

- ↑ Source: How To Extract Zinc Plate From Battery https://youtu.be/nSd8dF_EYGc
Bewahren Sie alle Komponenten der Batterie auf und werfen Sie nichts weg.
Mr Keshe wird in den folgenden Lehreinheiten erklären, wie man alles von einer Batterie anwenden kann.
Vorbereiten der Verbindungsdrähte
Für die Verbindung von Zinkblech, blanker Spule und Nano-beschichteter Spule mit einer Batterie, werden 3 Anschlussdrähte benötigt. Für diese Verbindungen können Litzendrähte oder ein einzelner, massiver, Kupferdraht verwendet werden. Schneiden Sie die Drähte in ca. 30 cm lange Stücke. Entfernen Sie den Kunststoff 2-5 cm an jedem Ende jedes Drahtes. Ein Ende eines Drahtes muss etwas länger abisoliert werden, um die Zinkplatte anzuschließen.

Verbinden der blanken Kupferspule und Zinkplatte
Verbinden der blanken Kupferspule
Um die blanke Kupferspule mit dem Verbindungsdraht zu verbinden, verdreht man die Enden einfach fest miteinander.


Verbinden der Zinkplatte
Um die Zinkplatte mit dem Verbindungsdraht zu verbinden, nutzt man den längeren, vom Kunststoff abgestreiften Teil des Verbindungsdrahtes. Man wickelt ihn in der Biegung der Zinkplatte um diese herum und dreht dann das Ende des Kupferdrahtes mit dem Kupferdraht wieder fest zusammen.


Verbinden der beiden Verbindungsdrähten
Die zwei Verbindungsdrähte werden an ihren freien Enden miteinander fest zusammengedreht.
Formen der Kupferbrücke und Verbinden der nanobeschichteten Kupferspule
Eine Kupferbrücke ist erforderlich, um die Nano-beschichtete Kupferspule in der Mitte des Glases aufzuhängen. Dazu wird eine einzelne, massive Litze Kupferdraht zu einer Brücke gebogen, so dass sie auf das Glas passt, wie auf dem Bild gezeigt. Als nächstes wird das Ende der Nano-beschichteten Kupferspule in der Mitte der Brücke befestigt. Der Nano-beschichtete Draht wird dazu stramm um die Brücke gewickelt. Ein Ende des dritten abisolierten Drahtes wird an einer der Seiten der Brücke befestigt.


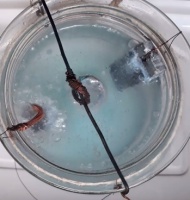
Platzieren der Spulen und Zinkplatte am Glas
Die Nano-beschichtete Kupferspule wird um die Brücke gewickelt und in der Mitte des Glases platziert. Die blanke Kupferspule und die Zinkplatte werden gegenüberliegend, nach innen gerichtet, am Glasrand befestigt. Die Nano-beschichtete Spule befindet sich genau dazwischen.Die Anschlussdrähte zeigen alle in eine Richtung, um an die Batterie angeschlossen zu werden.
Die Spulen sowie die Zinkplatte sollen oben auf gleicher Höhe und gleichmäßig lang sein.


Verbinden der Batterie mit den Verbindungsdrähten
Die Batterie sollte fast leer sein, also sehr wenig Restenergie beinhalten.
Die zwei miteinander verdrehten Verbindungsdrähte, werden mit dem Pluspol (+) verbunden und mit einem Klebeband fest befestigt. Das Verbindungskabel der Kupferbrücke bzw. Nano-beschichteten Spule wird mit dem Minuspol (-) verbunden und fest mit einem Klebeband befestigt. (Das Ende der Batterie mit dem Noppen ist der Pluspol und das flache Ende der Batterie der Minuspol.)
Schließen Sie die Anschlussdrähte eng und fest an die Pole der Batterie an.


Herstellen der 15%igen Salzwasserlösung: 150 Gramm pro 1 Liter sauberes Wasser
Stellen Sie eine 15%ige Salzwasserlösung her und leeren Sie diese in den Becher. Die Spulen und das Zink sollten nur ein wenig aus dem Wasser herausschauen und die Verbindungsdrähte bzw. Brücke das Wasser nicht berühren.


Produktion der Materialien (Aminosäuren und GANS)
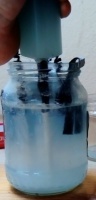
Bläschen steigen bald zur Oberfläche auf
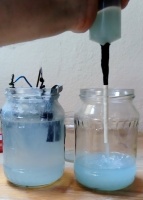
Man wird vermutlich sehr schnell Bläschen bei der Nano-beschichteten Spule aufsteigen sehen. Das hängt vom Rest-Energiegehalt der Batterie zusammen. Ist die Batterie wirklich fast leer, kann es sein, dass man keine Bläschen sieht, was aber nicht bedeutet, dass es nicht funktioniert. Ist noch ein bisschen mehr Rest-Energiegehalt in der Batterie, sollte man unmittelbar kleine Bläschen aufsteigen sehen. An der Wasser Oberfläche werden sich Aminosäuren bilden anfangen, welche eine fettig aussehende Schicht bilden. Oft ist diese Schicht sehr dick, oft nur sehr, dünn. Der Großteil des GANSes bildet sich meist am Boden des Glases One Cup One Life, kann sich aber auch schwebend inmitten der Salzwasserlösung befinden.
Jeder One Cup One Life ist anders, obwohl er vielleicht fast gleich gemacht wurde. Des Weiteren hängt es von vielen anderen Faktoren ab (Umgebung, Temperatur, Aufbau, usw.). Hat man mehrere Produktionen gleichzeitig laufen, sollten der Abstand zueinander mindestens 1m betragen, da sich die Felder gegenseitig beeinflussen und Produktionen verlangsamen können. (Am Bild von links nach rechts zu sehen: Nano-beschichtete Spule mit Luftbläschen, Aminosäuren, GANS)


Unterschiedliche Cups One Cup One Life produzieren GANS


Preparing the materials for the first harvest of Amino Acids, GANS and Plasma Water

Materials needed to extract the GANS from the One Cup One Life
.jpg)
Syringe, plastic spoon, a set of 3 glass jars and reserve bottles; straw, tape, plant spray bottle or small spray bottle.
Avoid using any metals in and around your GANSes, Amino Acids and Plasma Water. Don’t use metal spoons and remove metal lids from your glass jars or any metal in any shape or form.
Before you start, join the syringe and straw with a tape.
First application, how to remove first the Amino Acids from the One Cup One Life before removing the GANS
Method
With a plastic spoon, gently remove the Amino Acids that are floating on the top. These are a fatty looking layers floating on the surface of your One Cup One Life. Place these Amino Acids in your 1st glass jar to keep for further application.
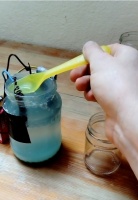
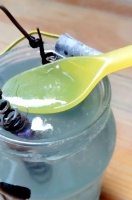
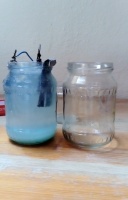
One Cup One Life and 1st glass jar


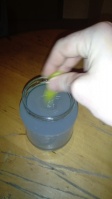
IN CASE OF EMERGENCY: Second application of the Amino Acids
The Amino Acids can also be applied as a source of nutrition. Simply dip your finger in the top layer of the Amino Acids once or twice a day and put it in your mouth.
As one dip with your finger in the Amino Acids replaces one full meal. Applicable for all living beings (animals).
The Amino Acids can still be present in the One Cup One Life or saved and put in the 1st glass jar.
Note: This application is only applied in case of starvation and shortage of food or nutrition.
Try: Start replacing one meal with one dip of one finger in the Amino Acids for your body to get used to the reduction of food.
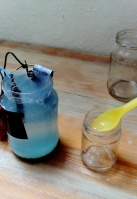
Removing the GANS from the One Cup One Life
First application
Apply the straw to the syringe by taping. Use the syringe to extract the GANS at the bottom of your One Cup One Life.
The extracted GANS taken up by the syringe, and present in the syringe, is put in your 2nd glass jar.
Or second application
In case you have no syringe you gently empty your One Cup One Life completely in the 2nd glass jar and wait until your GANS settles completely at the bottom and the top layer is clean water. Now you pour only the clean salty water back into your One Cup One Life and leaving the GANS behind. Now add extra salt water to your One Cup One Life to reach the original level, so that it continues producing GANS.
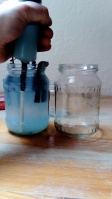
One Cup One Life and 2nd glass jar


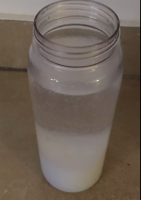
Washing of your GANS
1st washing of your GANS
Add clean water to your 2nd glass jar where the GANS you just extracted is present. Let the GANS settle to the bottom of the 2nd jar until you have clear Plasma Water above the GANS.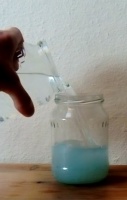
2nd glass jar


This salty water can be placed around the house in an open jar to deplete any virus present in the room.
You need to refresh this jar every day and dispose of this salty Plasma Water into the toilet, or any other safe disposal as it might contain the energy from the depleted virus.
A use for the extra salty Plasma Water is to put it into your washing machine.


2nd washing of your GANS
Add clean water to your 2nd glass jar where the GANS you just extracted is present. Let the GANS settle to the bottom of the 2nd jar until you have clear Plasma Water above the GANS.
2nd glass jar
This salty water can be placed around the house in an open jar to deplete any virus present in the room.
You need to refresh this jar every day and dispose of this salty Plasma Water into the toilet, or any other safe disposal as it might contain the energy from the depleted virus.
A use for the extra salty Plasma Water is to put it into your washing machine.
3rd washing of your GANS
Add clean water to your 2nd glass jar where the GANS you just extracted is present. Let the GANS settle to the bottom of the 2nd jar until you have clear Plasma Water above the GANS.2nd glass jar
This salty water can be placed around the house in an open jar to deplete any virus present in the room.
You need to refresh this jar every day and dispose of this salty Plasma Water into the toilet, or any other safe disposal as it might contain the energy from the depleted virus.
A use for the extra salty Plasma Water is to put it into your washing machine or washing the floor.
4th or 5th washing of your GANS in case there is any salt residual left in your Plasma Water
Add clean water to your 2nd glass jar where the GANS you just extracted is present. Let the GANS settle to the bottom of the 2nd jar until you have clear Plasma Water above the GANS.2nd glass jar
Making the Plasma Water ready to be applied
Repeat this process of washing until all the salt is removed from your 2nd jar.
Test: Tip your finger in the water after every wash and if the water tastes not salty anymore the process is finished.
Now you can add a spoon of your saved Amino Acids to your Plasma Water containing the GANS. You shake it and you let the GANS settle down until you have only clean Plasma Water on the top.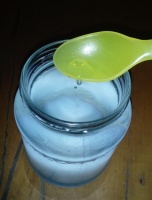
2nd glass jar

.jpg)
This Plasma Water is ready to be applied.
This gives your Plasma Water the extra field strength through the adding of the field strength of the Amino Acids explained by Mr Keshe.
The field strength of the GANS is continuously transferred to the water.
Advice: Always keep a readymade solution of 1 liter of clean water with 150 grams of normal table salt. The salt is completely dissolved in cold water and you can top up with this solution your One Cup One Life or multiple cups, even your Twin Cups.
Working with several cups of One Cup One Life and Twin Cups
You can harvest fresh GANSes from the One Cup One Life or different cups One Cup One Life or from your Twin Cups (these GANSes do not get washed yet).
You harvest the GANSes from the different cups of One Cup One Life all together and you add them to your 3rd glass jar.
When you have enough GANSes collected, you repeat again the washing process as in example 1\2\3\4, as explained above, until you have no salt present in your 3rd glass jar.
You can also keep on adding extra Amino Acids from other cups of One Cup One Life and your Twin Cups to the 1st glass jar. That you used from the first One Cup One Life and keep them safe for later as explained above how to apply the Amino Acids.
HOW TO APPLY IN A SAFE MANNER YOUR PLASMA WATER AND GANSES FROM YOUR ONE CUP ONE LIFE OR YOUR TWIN CUPS


The GANS needs to be always at the bottom of your bottle or any other container as visible in these images.
You only take the clean water above the GANS!
That is your Plasma Water from your One Cup One Life 2nd jar.
Same process for your One Cup One Life Twin Cups.
Never use any of your GANSes from any of your One Cup One Life or any GANS production, or any of your Twin Cups!
Do not eat, drink or touch GANS !
The field strength is too high to consume explained by Mr Keshe in the teachings.
Different ways of storing of the Plasma Waters, GANSes, Amino Acids
Keep them in glass or plastic jars and always keep away from any metals.- OneCup OneLife - Storing of GANSes 1.png
- OneCup OneLife - Storing of GANSes 3.png
Different applications of Plasma Water
Utilities
- OneCup OneLife - Utilities 1.png
Spray bottle
- OneCup OneLife - Utilities 4.png
Pocket spray bottle
- OneCup OneLife - Utilities 3.png
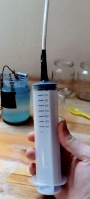
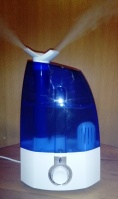
Portable humidifier
- OneCup OneLife - Utilities 2.png
Portable humidifier

Last rinse of your wash applied in your fabric softener compartment of your washing machine.
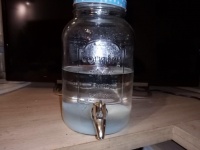
Water dispenser
Hubble Bubble
Humidifier


Plasma Water application preventive from the One Cup One Life or your Twin Cups
Repeat this process before bedtime and when you get up in the morning:
Wet your head (not completely)
Spray your front chest and the back.
Spray your throat and neck.
Wash your face and your nostrils.
Wash your hands.
Take a full bath of what you spray from top to toe.
Spray your clothing every time before you leave the house and before entering the house.
Start using if you have the back door of your home.
For people in appartments spray the elevator or stairs and use gloves to press the buttons.
Spray your shoes and trying to use the same shoes to go in and out. Spray your shoes in and out.
If possible apply a humidifier at all times at the front door and back door, containing only pure Plasma Water from the One Cup One Life or from your Twin Cups.
Spray your door handles, curtains and carpets.
Drink 300, and up to 500 ml Plasma Water in little sips during the period of 24 hours.
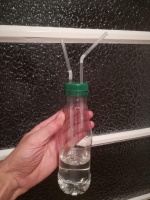
Inhale the field strength above of the Plasma Water through a hubble bubble (breathing cup) without metal present in the hubble bubble or create and use a self-made plastic system.
Repeat the inhalation process for a minimum of 3 times a day for duration of 10 to 15 minutes each time.
Use the same applications for all animals, as animals are exposed the same as humans to this virus. This application stands for all creatures that have blood running through their veins.
On advice of Mr Keshe, create per family 5 individual cups One Cup One Life, as each cup carries its own field strength to support and protect you and your family in depleting the virus from its field strength. Keep the cups with a minimum distance of 1 meter apart preferably in the corner of each room or in different rooms if possible. So that the fields of each cup do not interfere with each other, and best position is in front of the window.
Through the application of the Plasma Waters from the multiple One Cup One Life and Twin Cups present in your home, you are creating a high field strength as a prevention against the Corona Virus.
Advice as explained above: Mix the Plasma Waters and the GANSes from all your cups and Amino Acids together and apply as explained above.
Additionally, in all cases on advice of Mr Keshe
Involve every family member in the process.
Spray the Plasma Water of the One Cup One Life on the door handles.

Spray the Plasma Water of the One Cup One Life on the beds, tables, walls, car, curtains, clothing, shoes and winter covers like gloves and hats.
Spray all other objects like plastic curtains in the bathrooms, separation curtains in hospitals at risk of infection with Plasma Water One Cup One Life.
Your indoor pets as well as the outside animals, receive the same application of the Plasma Waters One Cup One Life. They receive the drinking water and spraying of their bodies and sleeping places from the finished Plasma Water from the One Cup One Life.
Place several glass jars with the salt water around the house preferably in every single room. They absorb the field strengths of the virus in these cups and deplete the virus from the environment. The glass jars have to be refilled every day with fresh Plasma Salt Water and the old Plasma Water has to be disposed of in the toilets and flushed through fast.
On advice of Mr Keshe place the One Cup One Life, Twin Cups that are in production around the house and if possible you place one in every single room. They deplete the field strengths of the virus in that environment.
Advice: Place them in front of the window and for extra information they can be in your bed room.
All the One Cup One Life, Twin cups that are in production should not be placed next to each other. You have to create sufficient enough space between the cups as your production stay optimal and stops all interferance of the field strength so that you create correct GANSes in your cups.
Application in case of infection
Apply in a Spray, the ready washed Plasma Water of the One Cup One Life every hour .
On your chest front and back.
Wet your face.
Wash your hands.
Wash your head. (not completely wet).
Drink with a 15-30 minute interval 50 ml, up to 700 ml a day.
Inhale 1-2 times per hour 10-15 minutes at a time.
Wash regularly hands and nostrils.
Spray the clothes and bedding regularly.
Spray the door handles and other objects like plastic curtains in the bathrooms at risk of infection with Plasma Water One Cup One Life.
Additional protection for the caretakers and caring family members
Before any person enters the room of an infected person, you apply before entering and leaving the room.
Use a Mask.
Wet your head (not completely).
Spray your front chest and the back.
Spray your throat and neck.
Wash your face and your nostrils.
You wash your hands.
And drink 20 ml of Plasma Water.
Additional information
How to use a mask
Use a mask, never touch it directly and always put it on and take it off at the rubber bands.
Before you take off the mask, spray it with your Plasma Water One Cup One Life. Wait for 3 minutes before removing.
To clean the mask, put it in a bowl with Plasma Water One Cup One Life for 10 - 15 minutes.
After drying you can use the mask again.
It is good if you put the cleaned mask back on in a slightly moist state.
Other
Prevent shaking hands with other people and don’t apply the normal welcome kisses and hugging.
Different additional information
Additional explanation on the fire Nano-coating of the One Cup One Life
The understanding of the fire coating before the winding around the pencil is as follows: You create space gaps in your Nano-coating layers.
Explained in the different Thursday teachings of MT Keshe.
Instead of using the fire Nano-coating you can apply the caustic soda method.
The Nano-coating process can be without the chicken mesh present.
In this process of applying the caustic soda method https://en.kfwiki.org/wiki/Category:Nano-coating
Application with battery or without
A nearly flat battery is only used to speed up the process of production of the GANSes.
Instead of using a battery you can place a Copper wire between the connections.

Understanding the Soul of the One Cup One Life
You never need to dismantle your One Cup One Life. Respect the soul you have created!
Link: Understanding the Soul of the One Cup One Life
Useful tips
You can add on top of each metal plate like your Zinc or Copper or Nano-coated, a new Zinc plate or a new Nano-coated Copper plate or a new Copper plate. It doesn't need to be big. Make sure it touches the original plate or the wires.
Make sure that your salt water solution is always at 150 grams of salt per one liter of clean water.
Check on regular basis that your battery is not fully flat. Only to be replaced with an already used battery.
In case of real emergency you can use salt water direct from the sea to have your salt solution.
Not a single One Cup One Life in production should be covered. Nor your Twin Cups.
Additional information: As it is summertime coming, if you have a swimming pool you can create an extra field of protection. Start adding your Plasma Salt Water and Plasma Water in your swimming pool and you can swim in the water. Try to reduce as much as possible adding of the chlorine tablets.
How to produce Amino Acids when your cup is not producing sufficient enough
You place your One Cup One Life next to an open window or place it outside for a couple of hours.
You also can place the already finished Plasma Water with the GANS present outside without a cover or near the window. It might take some time, but it will produce Amino Acids.
New: Twin Cup of One Cup One Life
The applications are identical to the first One Cup One Life.
MT Keshe has added in the teaching 318th Knowledge Seekers Workshop the blueprint of the Twin One Cup One Life:
Application prevention and reversal
The field strength of the GANS is continuously transferred to the water.
The field strength of the Plasma Water depletes the energy from the virus from its stronger field strength. Because it depletes the virus from its field strength it incapacitates the virus.
Important
Protect and check
Do the nose and breath test
Pinch your nose with your fingers and hold your breath for 10 seconds every morning. If you don’t cough within the 10 seconds and if can hold your breath for 10 seconds, you are okay.
Start testing this 3 times a day.
Spray your body with the Plasma Water of the One Cup One Life. If you feel any pain or any pressure that is discomfortable, please be alerted you might be infected. Test yourself.
Other signs to look for
Other signs are cold sweats, feeling feverish, but no actual fever present.
Bad headache.
Pressure and severe pain felt when you test spray with the Plasma Water from the One Cup One Life: On your body, starting from the head, neck, chest, kidneys, stomach, ovaries, womb, testicles, prostate, knees and toes and you first reaction is severe headache, severe swollen tongue and very difficutly to breath and swallow food, no appetite and always want to sleep. (Most people don't show any signs of fever anymore. You should be on high alert. These are the signs of Corona Virus infection.)
At this given moment you have to check for extra signs like pains in the femur, kidneys, knees, toes, these are the signs you have to look for.
If any of these symptoms are present, please let us know in our available channels at the end of this document.
Links for help
You will find help in the following international Telegram language groups.
Keshe One World Family: https://t.me/joinchat/I2ksVVbvb7OjcDR_3qSugQ
Established language groups on Telegram and are expanding every day, are Portuguese, Farsi, Italian, German, Nordic, Maltese, Netherlands, Canadian, French, Romanian, Spanish, Keshe One World Family and more will follow as you are applying for it.
First edition video of the One Cup One Life created for the first emergency relief in China: https://mega.nz/#F!RXwi2QSb!HqqCqSiflkaD7X5FFssnMg
Finishing words
Keep strictly to the above described "Applications to prevent and in case of any infection!"
In case of any infection please contact the www.keshefoundation.org webmaster or try to find the Universal Council language member, Universal Council support member, or the nearest Knowledge Seeker.
Collect as much data possible of your observations and freely share your knowledge.
Come and share your knowledge in the public testimonials.
Be careful and cautious!
As it is mentioned above about the Twin Cups One Cup One Life the complete information will be added in the near future.
On M.T.Keshe's request you received the knowledge about the One Cup One Life, please pass on the knowledge and teach 10 more people about the One Cup One Life and request from the people you teach they teach 10 more as a promise to receive this free gift to give freely.
We are here to serve and not to be served!
We request freely for you to sign the World Peace Treaty.
This page and information was updated 2020-03-19


